
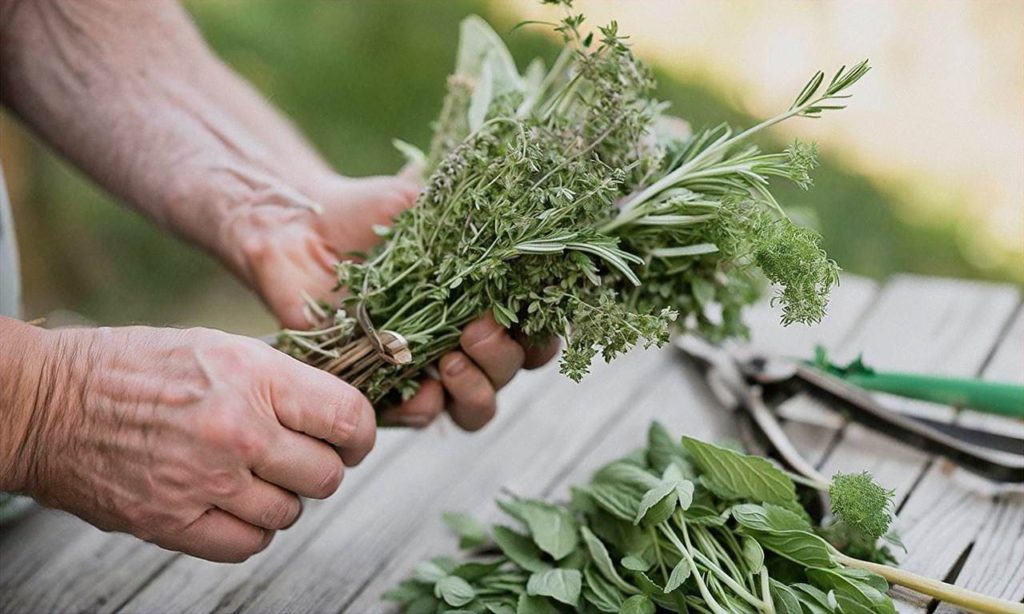
When to Harvest Herbs
Here is a draft 847-word article on when to harvest herbs for the section “When to Harvest Herbs”:
Knowing when to harvest herbs from your garden is key to getting the most flavor and preserving the delicate oils in the leaves. The phrase “How to Harvest and Store Your Garden Herbs” encompasses when to cut herbs for optimal freshness and how best to preserve them. This article focuses specifically on “When to Harvest Herbs” from the garden.
The Best Time of Day to Harvest Herbs
Many gardeners believe the optimal time to harvest herbs is in the morning after any dew has evaporated but before the sun gets too hot. The morning hours allow the plant to recover some moisture overnight but the leaves are dry for clean cutting. How to harvest and store your garden herbs requires knowing the prime moment.
Mid-morning sun also helps release the aromatic essential oils, lending more intense flavor. Afternoon heat causes the oils to evaporate and the flavor to diminish. For the freshest, most flavorful cut, harvest herbs like basil, mint, oregano, thyme, sage, and parsley in the morning.
Harvest Based on Flowering Stage
In addition to time of day, the stage of flowering plays a key role in when to harvest herbs. Herbs should generally be cut before the plant flowers for peak flavor, but rules differ among varieties.
Leafy herbs like basil, mint, cilantro, and parsley have the best flavor and aroma before flowering when the leaves are tender. Allowing them to bolt redirects energy into seed production, causing leaves to toughen. For these herbs, harvesting before buds appear ensures tender texture and balanced flavor.
By contrast, flowering herbs like lavender, rosemary, sage, thyme, and dill transition to their full flavor potential once flowering begins. For these woody herbs, harvest sprigs and leaves just as buds form. At this point, essential oils are most concentrated.
Monitor Leaf Growth
The size and quantity of leaves signals the perfect stage for harvesting many herbs. For example, parsley and cilantro taste best and are easiest to clean and de-stem when the leaves are large enough but before going to seed. Pinching off flowers as they form encourages more tender new leaf growth too.
Likewise, chives become tough when the stalks fully elongate. Snipping chives when they reach 6 inches high keeps them mild flavored. How to harvest and store your garden herbs relies on optimal leaf size for flavor.
Base Harvests on Plant Use
Finally, how you plan to use each harvested herb may guide when to cut it. Herbs destined for drying or storage in vinegar, oil, butter, or sugar have different harvest needs than those eaten fresh. Learn when to harvest herbs based on your preservation method.
Herbs for drying or freezing are best harvested early on, before buds or flowers emerge, to capture their essence in each leaf. On the other hand, flower heads and seeds add visual and flavor interest when infusing herbs in oil or vinegar. Allow those plants to mature before cutting.
Understanding each herb’s ideal stage of growth ensures you harvest at the perfect time for use. Matching harvest time to eventual application results in the best flavored and longest-lasting herbs from the garden. Follow these visual cues for knowing when to cut.
Tips for Checking If Herbs Are Ready for Harvest
Regularly inspect herb plants to recognize when leaves reach prime flavor and texture for harvesting. Here are tips on how to know herbs are ready:
– Crush a leaf and sniff to check aroma concentration
– Feel leaf and stem thickness for optimal texture
– Monitor plant height based on herb variety
– Watch for signs of buds, flowers, and seed heads
– Check for large leaves and vigorous new growth
Equipped with this criteria for identifying harvest-ready herbs, you can determine the best moment for cutting fresh herbs or preserving them dried or frozen. Match harvest time to each herb’s peak flavor period.
Summary
When to harvest herbs for maximum flavor, essential oils, and planned use depends on the plant’s growth stage, time of day, and visual quality. Learn the ideal stage of leaf production for each variety and check aroma, texture, size, and flowering cues to know when herbs are ready. Time morning cuts to preserve delicate oils. Harvesting herbs at their prime results in the best flavor and quality no matter how you store them.
How to Know Herbs are Ready for Harvesting
Knowing the right time to harvest herbs from your garden ensures you capture the best flavor and aroma from each plant. Herbs harvested at peak maturity will offer the most intense flavor profiles when dried or preserved for later use.
Watch for these signs to identify when popular culinary herbs like basil, thyme, rosemary, oregano, sage, mint, cilantro, dill, and parsley are optimally ripe and ready for picking:
Basil – Pinch off a leaf and taste it. Harvest basil once the leaves develop their characteristic bold, sweet flavor. The plants should be at least 6 inches tall. Choose leaves before the plant flowers for the best flavor.
Thyme – Thyme is ready to harvest once the plants are 6 inches tall. Pick leaves and top stems when the flowers begin to open. The flavor will be most intense right before thyme blooms.
Rosemary – Harvest rosemary when the bushes reach 1-2 feet tall. Pinch off flavorful needle-like leaves just before the plants start flowering. New growth tends to have the best taste.
Oregano – Harvest oregano once the plant is 4-6 inches tall and has developed its zesty, spicy aroma. For the best flavor, cut whole stems when the plant buds or just before it flowers.
Sage – Pluck sage leaves once the plants grow to 6 inches tall. Harvest before flowering for full flavor. The leaves should be large, fragrant, and tender.
Mint – Harvest mint once the plant is 4-6 inches tall and fills out. For the best flavor, cut stems just before flowering. New growth has superior flavor to larger, older leaves.
Cilantro – Snip cilantro leaves once the plant reaches 3-5 inches tall. Harvest before it bolts or flowers for optimal flavor. Cut leaves as needed, allowing the plant to continue producing.
Dill – Pick dill leaves when the plant hits 6 inches in height. For the best flavor, harvest before the plant flowers and goes to seed. Both the leaves and seeds can be used.
Parsley – Cut parsley once the plant reaches 4-6 inches tall. Harvest by cutting whole stems rather than individual leaves. New growth offers the best flavor.
In addition to size, judge ripeness by examining leaf color and aroma. Herbs at peak harvest time will have vibrant, green leaves and give off a robust, fragrant smell when touched or crushed. Old or overripe herb plants may have yellowing leaves, appear wilted, or put off less fragrance.
The time of day for harvesting also impacts quality. For the highest essential oil concentrations, it’s best to pick herbs in the morning after any dew has evaporated. This helps preserve the aromatic compounds that give each herb its signature scent and taste. Afternoon heat causes some loss of flavorful oils.
With most herbs, repeated harvesting stimulates new growth and more abundant leaf production over the season. As long as you don’t cut more than one-third of a plant’s foliage at once, you can harvest multiple times without damaging plants. Just be sure to stop pruning several weeks before your first expected fall frost so herbs can harden off for winter dormancy.
Follow these visual cues and best practices when harvesting, and your homegrown herbs will deliver the fullest flavors when you dry, freeze, or preserve them for future recipes. Refer back to this guide on how to know herbs are ready for optimal harvest times. Pair with tips on proper tools to use, correct cutting methods, and preferred storage conditions after harvest. Soon you’ll become an expert on harvesting herbs at their flavorful best from your productive garden.
Harvesting Herbs in the Morning vs Evening
When it comes to harvesting herbs from your garden, many home gardeners wonder – should I pick the herbs in the morning or evening? Is there an ideal time of day to harvest that results in superior flavor or extended freshness? This article will examine the pros and cons of morning versus evening harvesting.

There are good arguments on both sides of this debate. Some experts insist that mid-morning, after the dew has evaporated but before the sun gets too hot, is the perfect herbal harvesting time. Others argue for late afternoon or early evening, when essential oil concentrations peak. Ultimately, the ideal harvest time depends on the specific herb variety and your plans for using or preserving the harvest.
Morning Herb Harvesting
Harvesting herbs in the early morning hours has several potential advantages:
– Avoiding the Heat: For herbs grown in hot summer climates, morning harvest times allow you to pick the herbs before the peak daytime temperatures. This prevents the volatile essential oils in herbs like basil, oregano, and thyme from evaporating away in the midday heat.
– Higher Moisture: Early mornings tend to have higher humidity and moisture levels. For herbs that you plan to use fresh immediately, the higher moisture content can translate to better flavor.
– Clean Cuts: Harvesting in the morning may allow herbs to be cut more cleanly. Some herb gardeners feel that morning harvesting results in less bruising or other damage to the plant.
If you plan to dry or otherwise preserve your herbs, morning harvesting when humidity levels are higher may require additional drying time compared to herbs picked later in the day.
Evening Herb Harvesting
While mornings have their perks, evenings can also be an opportune time for gathering herbs from the garden. Benefits of evening harvesting include:
– Peak Flavor: Many culinary herbs contain the highest essential oil concentrations later in the day. For example, just before flowering, mint may contain over three times more essential oils in the evening compared to the morning. Evening-picked herbs may have superior aromas and flavors.
– Less Chance of Wilting: Harvesting in the cool of the evening helps minimize moisture loss after picking. Herbs like basil bruise and degrade quickly when exposed to heat and sun. Evening harvesting keeps them fresher.
– Avoiding the Bees: Bees and other pollinators tend to be more active during daylight hours and less active in early evenings. For herbs like lavender, rosemary, sage, and thyme that attract bees, evening harvests involve less risk of stings.
If morning moisture or clean cuts are more important for your needs, evenings may not provide ideal conditions. Additionally, evenings tend to have less light which can make it harder to inspect plants and complete harvesting.
Finding the Right Balance
While concentrated oils may peak in the evening, some deterioration can also start taking place after long hot days. And morning moisture aids fresh use but slows the drying process. As with most things, moderation is key.
Many herb gardeners find the ideal harvest times fall somewhere between the temperature extremes of midday and the moisture saturation of early mornings. Mid-morning through late afternoon provides a good compromise.
You can also tailor your harvest times to how you plan to use each herb variety. For example:
– Harvesting basil for pesto in the evening
– Gathering oregano as the morning dew dries for immediate use in salsa
– Picking lavender flowers before the heat of the day for use in sachets
Get to know your herb garden’s daily rhythms and you’ll discover the prime times to gather its botanical bounty. Pay attention to moisture, humidity, bee activity and the needs of each herb variety. With a little trial and error, you’ll find your optimal times for harvesting herbs in the morning versus the evening.
Using Sharp Tools for Clean Cuts
When harvesting herbs from your garden, using clean, sharp tools is extremely important for the health of your plants. Dull blades can crush stems instead of making clean cuts, opening the door for diseases and pests to invade (1). The key is to always have properly sharpened and sanitized tools on hand before beginning the harvesting process.
What Tools Should You Use?
Quality herb snipping scissors, gardening shears, and knives are essential for harvesting herbs. Stainless steel blades resist corrosion and hold an edge longer than cheaper carbon steel options. Bypass pruners make the cleanest cuts on tender new growth, while anvil pruners work better on thicker, woodier stems. Select ergonomic handles that fit your hand size and grip comfort.
It’s wise to dedicate a set of herb harvesting tools solely for use in the garden. This prevents any chemical residues or dirt on garage or kitchen tools from transferring to the herbs. Mark them in a distinguishable way to separate them from other garden tools.
Sharpening Your Herb Harvesting Tools
A common mistake is continuing to use dull blades out of neglect or procrastination (2). But harvesting herbs with a dull tool crushes and shreds delicate leaves and stems instead of slicing them cleanly (3). This causes more stress and injury to the plant, potentially introducing diseases that can spread quickly.
It only takes a few minutes to sharpen your herb snips and knives with a whetstone or electric sharpener before heading out to cut herbs. Notice when your blades seem to tear rather than slice cleanly through stems and make sharpening a habit before each harvest for optimal results (4). Disinfect all tools with rubbing alcohol beforehand as well.
Proper Cutting Technique
When harvesting herbs, use a gentle touch and make cuts at a 45 degree angle (5). This allows the stems to take up the most water and remain viable after cutting. Trim stems just above leaf nodes where new growth emerges, leaving some leaves behind to nourish the plant through photosynthesis.
Harvesting in the early morning or late evening causes less stress or wilting. During the heat of mid-day, the plant’s moisture and nutrient reserves are at their lowest ebb and are not ideal times for trimming (6). Work quickly and get cut herbs into a cool, shaded area right away.
Avoid yanking at tangled stems or stripping off leaves by hand. The oils in aromatic herbs like thyme, sage, and mint can cause dermatitis for those with sensitive skin. There’s also an increased risk of breaking the whole plant. Instead, patiently use properly sharpened herb snips for a clean, quick harvest.
Caring for Harvesting Tools After Use
Once finished trimming herbs, be sure to properly clean harvesting tools of all dirt and debris before storing them away (7). Soak scissors and pruners in a mild bleach solution of one part bleach to nine parts water for 10 minutes. Use an old toothbrush and mild soap to scrub knife blades before drying thoroughly.
At the end of the season, sharpen all blades one final time before lubricating and storing in a dry location over winter. High quality tools cared for properly will last for many productive herb gardening years. The investment of a little time into keeping blades sharp and sanitized is well worth the improved harvest and life span of your herb garden.
How to Dry Herbs for Storage
Here is a draft 892-word article on “How to Dry Herbs for Storage” for your niche culinary site:
Drying or dehydrating fresh herbs is one of the easiest methods for preserving these garden treasures for long-term use. Properly dried herbs can retain much of their flavor, aroma, and color when stored correctly for 6 months to a year. Learning how to dry herbs for storage will allow any gardener to enjoy the fruits of their labor all year round.
The key to successfully drying herbs for storage is to remove moisture slowly and thoroughly before storage. Moisture supports the growth of bacteria and molds which can cause dried herbs to spoil. There are several methods home cooks can use to dry herbs from their gardens or farmers market bounties.
Air Drying Herbs
Air drying is the most common way to dry leafy herbs like basil, mint, sage, thyme and rosemary. To air dry herbs, wash and dry the stems thoroughly, then gather them into small bundles with kitchen string or rubber bands. Use sharp scissors or garden shears to cut the ends of the stems evenly before bundling.
Hang these small bundles of herbs upside down in a warm, dry, dark place with good air circulation. The optimum temperature for air drying is between 70-100 degrees Fahrenheit. Kitchen cupboards, pantry shelves or wire drying racks work perfectly for herb air drying.
The drying process typically takes 1-2 weeks. To test if bundles are fully dried, check that the stems snap crisply when bent and the leaves crumble easily between the fingers. Monitor drying bundles closely for any mold growth and discard affected herbs right away.
Oven & Dehydrator Drying
Using a low temperature oven or an electric food dehydrator are faster ways to thoroughly dry herbs for storage. These methods remove moisture more efficiently while retaining the volatile aromatic essential oils better than air drying or microwave methods.
To oven dry herbs, place clean stems and leaves in a single layer on a baking sheet. Dry at the lowest possible oven temperature, ideally between 95 to 115 degrees Fahrenheit. Conventional ovens typically only go down to 170 degrees Fahrenheit, which will still work to dry herbs effectively.
Herbs dried in a 95 degree Fahrenheit oven will take 4-6 hours, while 115 degree oven drying takes just 2-4 hours. Check the herbs every 30 minutes until completely dried and crisp. Electric food dehydrators specifically designed for drying herbs, fruits, vegetables and meats are another excellent investment for home cooks who grow their own herbs or buy in bulk. Quality dehydrators have adjustable thermostats that allow precise control over the temperature and fan speeds to customize drying.
Proper Storage for Dried Herbs
After herbs are completely dried, they must be stored correctly in airtight containers to retain flavor and prevent spoilage or contamination. Glass jars and reusable silicone bags or plastic containers all work very well for storing dried herbs. Before filling with herbs, be sure containers have been thoroughly cleaned and dried.
For the freshest flavor, use dried herbs within 6 months. Properly stored dried herbs can retain good flavor for up to a year. To check if dried herbs are still good, give them a sniff test. Discard musty or moldy smelling dried herbs. Dried herbs that smell vibrant and true to their fresh versions will liven up all your cooking.
With the simple techniques above for successfully drying herbs at home, any gardener can easily preserve the herb harvest for cooking all year long. Drying herbs with care after the growing season ends makes it possible to enjoy their unique flavors in recipes for many months after harvesting them. Learning how to dry herbs for storage unlocks their flavors and fragrances so we can savor garden herbs no matter the season or weather.
Storing Dried Herbs in Jars or Bags
Once you have dried your fresh garden herbs, proper storage is crucial for preserving the herbs’ flavors and aromas over time. Two convenient methods for storing dried herbs are jars and bags. Each has its own advantages and considerations when it comes to keeping your homegrown herbs tasting their best.
Jars
Glass jars are a classic choice for storing dried herbs. Their airtight seal blocks out excess light and moisture, two factors that can cause herbs to lose potency faster. Look for jars with tight-fitting lids to ensure no air or humidity sneaks inside. Clear glass also allows you to easily see your herb supply so you know when you’re running low.
When storing dried herbs in jars, it’s best to keep the jars out of direct sunlight. You can stash them in a cool, dark kitchen cupboard or drawer. Just open the jars occasionally to allow fresh oxygen to circulate and prevent any moisture buildup. Glass jars can also beautifully display your harvested herbs on the countertop or spice rack. Just bear in mind that light can quicken deterioration.
An optimal jar size for storing dried herbs is around 8 ounces. This allows enough room for the herbs to breathe without too much excess space where air could get trapped. Be sure to label jars with the herb name and date for easy identification.
Bags
Resealable plastic bags also do the trick for storing dried herbs. Opt for thick bags made of durable plastic that won’t easily rip. Freezer bags tend to be extra sturdy. Make sure any bag you select has an airtight seal when closed to block light and moisture.
An advantage of bag storage is being able to press out excess air before sealing. This minimizes the oxygen inside that could cause herbs to lose vibrancy faster. You can manually squeeze bags to remove air or use a straw to suck it out. Just be careful not to crush the dried herbs when compacting the bags.
Since plastic bags are opaque, storing herbs inside cabinets or drawers keeps the contents hidden and protected. Bags take up less space than jars if storage area is limited. They’re also very lightweight and portable for taking herbs on the go. Just like jars, be diligent about properly labeling with names and dates.
No matter which storage vessel you choose, the most important rule is to use your homegrown dried herbs within one year. Stored properly in a cool, dark place, dried herbs can retain excellent flavor and fragrance for up to 12 months. After that, the essential oils that give the herbs their signature taste and smell start to significantly dissipate. So try to use up older herbs first before tapping into a new batch.
With the right storage methods, you can enjoy the fruits of your herb garden labor all year long. Jars and bags both have their convenience perks for preserving your home-dried herbs. The key is shielding the herbs from light, heat, and excess moisture by sealing them in an airtight container kept in a dark space. Then you’ll have delicious, vibrant herbs ready to elevate your recipes no matter the season. Follow these herb storage tips, and your garden harvest will keep on giving.
Freezing Fresh Herbs for Year-Round Use
# Freezing Fresh Herbs for Year-Round Use
Freezing fresh herbs is an excellent way to preserve the bounty from your garden for use all year long. Having a supply of frozen herbs on hand makes it easy to add fresh herbal flavor to meals, even when your garden is covered in snow.
## Best Herbs for Freezing
Most herbs freeze very well. Herbs with high moisture content, like basil, chives, cilantro, dill, parsley, sage, and mint hold up best. Sturdy, thick-leaved herbs like rosemary, thyme, oregano, lavender and savory also freeze nicely. More delicate herbs like tarragon and chervil don’t retain as much flavor during freezing.
When freezing herbs, it’s best to freeze them soon after harvesting for maximum flavor retention. Freezing them at the peak of freshness locks in the most essential oils and aromatics that give each herb its unique taste and scent.
## Harvesting Herbs for Freezing
The best time to harvest herbs for freezing is in the morning after any dew has dried but before the sun gets too hot. This helps ensure the highest oil concentration. Use a pair of sharp scissors or garden shears to cut the stems rather than pulling or tearing the herbs. Try to keep stem lengths uniform to aid in even freezing.
Rinse the herbs gently under cool water and pat thoroughly dry with paper towels or a salad spinner. It’s important not to freeze herbs when they are wet or moisture will form damaging ice crystals during the freezing process.
## How to Freeze Herb Leaves
The easiest way to freeze leafy herbs like basil, mint, parsley, cilantro or dill is to place measured amounts in ice cube trays. Fill each compartment with roughly one tablespoon of leaves, then cover the tray with plastic wrap and place in the freezer. Once frozen, pop the herb cubes out and transfer to a labeled freezer bag. This makes it easy to toss a pre-measured amount into recipes all year long.
For smaller amounts, chopped herbs can be spread in a single layer on a baking sheet and frozen initially. Then promptly transfer to air-tight freezer bags or containers once fully frozen.
## Freezing Herb Stems
Sturdy herb stems, like those from rosemary, thyme, sage and oregano can also be frozen easily. After harvesting, wash and completely dry herb branches or sprigs. Place them directly into freezer bags, seal and label. To use, simply remove desired amounts from bags and chop, strip or crush leaves as needed.
An alternate method is to chop herbs coarsely before freezing in ice cube trays or bags. This makes it faster to incorporate them into cooking. But take care not chop too far in advance or essential oils will start to dissipate.
## Storing Frozen Herbs
Be sure to label all frozen herbs clearly with the name and date. Well-wrapped herb cubes or bags store best at 0°F or below. Use within 6 to 12 months for best quality.
Always use frozen herbs directly from the freezer. Don’t thaw first or the plant cells will break down and lose flavor. Add them straight to soups, sauces, stews or other recipes for an intense boost of just-harvested taste.
Enjoy convenience and flavor with frozen herbs from your garden all year long!
Tips for Freezing Herb Stems, Leaves and Seeds
When it comes to freezing herbs for long-term storage, it’s important to know that different parts of the herbs freeze better than others. Here are some tips for getting the best results when freezing herb stems, leaves, and seeds.
Herb Stems
– Herb stems don’t always freeze well on their own. They can become limp and lifeless when thawed. It’s best to freeze stems still attached to herb leaves.
– If freezing solo stems, choose woody stemmed herbs like thyme, rosemary, oregano, and sage. Trim off leaves, then wash and dry stems before freezing.
– Another option is to chop stems before freezing. Add them to ice cube trays with a bit of water or oil to use later in cooking.
Herb Leaves
– Delicate herb leaves like basil, mint, and parsley freeze better than tougher woody stemmed leaves.
– Wash and dry herb leaves thoroughly before freezing. Carefully separate any bad leaves.
– Lay leaves in a single layer on a baking sheet and place in the freezer until hard. Transfer to air-tight containers or bags.
– Chopped leaves freeze well too. Add a bit of water or oil to help prevent freezer burn. Ice cube trays work great for chopped herbs.
Herb Seeds
– Freezing is an excellent way to preserve seeds from cilantro, dill and other herbs that produce abundant seeds.
– Allow seed heads to fully mature and dry on the plant before harvesting for freezing.
– Separate the seeds from any excess plant material. Place seeds in a single layer in an airtight container.
– Store frozen herb seeds in a cool, dark place for up to a year. Thaw before planting.
How to Freeze Herbs
No matter which part of the plant you are freezing, the goal is to quickly freeze the plant matter to prevent damage to the cell structure. Here are some standard practices to follow:
– Make sure herbs are clean and completely dry before freezing. Moisture encourages ice crystals to form which damages leaves and seeds.
– Seal herbs in an airtight container or heavy-duty plastic freezer bag, pressing out excess air. This prevents freezer burn which degrades quality over time.
– Label the container with the herb name and date. Use frozen herbs within 6 to 12 months for best flavor.
– Choose containers that are dark in color to prevent light exposure which can also lead to faster deterioration. Glass jars, aluminum cans or foil pouches all work well for storage.
Follow these tips when freezing herb stems, leaves and seeds for best quality and usage. Be sure to harvest herbs at their peak and prep them properly before freezing too. This allows you to enjoy their fresh flavors in recipes all year long.
Oil Infusion as a Storage Method
# Oil Infusion as a Storage Method
Oil infusion is an excellent way to preserve the flavor and aroma of fresh herbs from your garden for use all year long. The oil extraction process allows the essential oils and phytochemicals in herbs to infuse into the carrier oil, creating a flavored herbal oil that can be stored at room temperature for up to a year.
When considering oil infusion as a storage method for your garden herbs, it’s important to follow some best practices. Choosing the right herbs and carrier oils, proper sanitation, and storage are key for creating a shelf-stable product.
## Selecting Herbs for Oil Infusion
More delicate herbs with higher moisture content such as basil, tarragon, chives, parsley and cilantro are great candidates for oil infusion. The oil helps protect the herbs from oxidation while allowing their flavors to permeate the oil. Sturdy herbs with strong flavors like rosemary, thyme, sage, oregano and marjoram also infuse beautifully into oil. Garlic, chili peppers and lemon or orange zest can provide a flavorful kick as well.
When selecting herbs for oil infusion, it’s best to use fresh herbs at their peak of flavor. Harvesting herbs in the morning after the dew has evaporated ensures the best flavor retention. Use clean scissors or garden shears to snip herbs, leaving some stem attached. Gently rinse if needed and pat thoroughly dry before infusion.
## Choosing a Carrier Oil
The most common carrier oils used for herb infusions are extra virgin olive oil and grapeseed oil due to their neutral flavors. Other options include sunflower, safflower or avocado oil. Regardless of oil choice, select high quality, food-grade oils packaged in dark glass bottles. The oil’s freshness and acidity level can impact flavor, so taste test oils before using.
## Proper Sanitation
Like all preserved foods, keeping equipment and ingredients sanitary is crucial when infusing herbs into oil. Be sure to wash herbs thoroughly and allow to dry completely before adding to oil. Sterilize jars or bottles either by running through the dishwasher or submerging in a boiling water bath for 10 minutes. Allow containers to air dry before using. Always use clean utensils when handling ingredients.
## Infusion Methods
There are a few techniques for infusing herbs into oil. The easiest is to loosely fill clean, dry jars with fresh herbs, then cover completely with oil. Other options include blending herbs into oil with an immersion blender or heating oil and herbs very gently on the lowest stovetop setting. Regardless of technique, the key is to not overheat the oil, which can diminish flavors.
Once herbs are infused, let the jar or bottle sit at room temperature away from light for 2 weeks up to a month. Shake gently every few days to distribute flavors. Taste regularly after 2 weeks to monitor flavor development. Strain through cheesecloth when flavor reaches the desired intensity. Avoid leaving herbs in oil for longer than a month to prevent spoilage.
## Storage
For short term storage up to 6 months, decant flavored oil into smaller sterilized bottles or jars, leaving 1⁄2 inch headspace. Seal tightly and store in a cool, dark cupboard. Freezer storage for up to a year is also an option. Leave ample headspace in bottles or jars as oil will expand when frozen. Thaw completely in the refrigerator before using.
When stored properly, herb-infused oils retain maximum flavor for up to a year. Their versatility as cooking ingredients, marinades, dipping oils and gifts make oil infusion an invaluable storage method for garden herbs. Follow best practices for handling and watch for signs of spoilage before use. With some creativity, preserved herbal oils can be enjoyed all year long.
Vinegars and Salts for Flavorful Preserved Herbs
In addition to drying and freezing, two popular methods for preserving herbs from your garden are infusing them into vinegars and mixing them with salts. These techniques keep herbs fresh for months while also infusing them with delicious complementary flavors. Read on for tips on preserving your harvest using vinegars and salts.
Choosing Your Herbs
Most tender leafy herbs like basil, tarragon, chives, parsley, cilantro, dill, and mint hold up well when preserved in vinegar or salt. Heartier herbs like rosemary, thyme, oregano, and sage also shine when infused. Consider which herbs you have in abundance from your garden that would pair nicely with vinegar or salt.
Herb-Infused Vinegars
Infusing fresh herbs, spices, garlic, chili peppers, citrus zest, peppercorns, and other flavorful ingredients transforms an ordinary vinegar into a unique flavor bomb, perfect for seasoning vegetables, salad dressings, marinades, and more.
When infusing vinegars, opt for high-quality ingredients. Use fresh organic herbs at their peak and raw, unfiltered vinegars like apple cider vinegar, white wine vinegar, champagne vinegar, sherry vinegar, or rice wine vinegar. Make sure all equipment, containers, and utensils are extremely clean and sterile to prevent bacteria growth.
To make an herb vinegar infusion, lightly bruise or crush fresh herb leaves and stems to release their essential oils and flavors. Stuff clean glass jars tightly with the herbs, leaving a 1⁄2 inch headspace at the top. Heat the vinegar until just before a simmer and pour over the herbs, making sure they are completely submerged. Top off with more vinegar if needed. Seal the jar tightly and store in a cool, dark place, shaking gently every day. Taste after 2 weeks, though some vinegars take 4-6 weeks to fully infuse. Strain out and compost the spent herbs.
For best flavor, use herb-infused vinegars within 6 months to a year. Always label infused vinegars with the ingredients and date. Refrigerate after opening. Signs that your infused vinegar has gone bad are mold, unpleasant aroma, bubbling or fizzing, or sliminess. As long as the vinegar smells strongly aromatic without off odors, it is likely still safe to consume.
Herb-Infused Salts
Incorporating herbs, citrus zest, spices, dried chilies, garlic, and other flavor boosters into salt is an age-old preservation technique that transforms everyday salt into a powerhouse seasoning. Herb salt mixes make unique gifts, enliven roasted vegetables, perk up grilled meats, and lend intrigue to homemade crackers and baked goods.
As with infused vinegars, start with the best quality ingredients when making herb salts—fresh organic garden herbs, just-harvested sea salt or kosher salt, and spices sourced from a reputable dealer. Make sure equipment is meticulously clean. Glass jars or grinders make attractive storage vessels for infused salts.
Two easy methods exist for infusing salts with herbs. The slower cold method involves layering salt and chopped herbs in a container, allowing flavors to meld over a few weeks. The faster hot method heats salt and herbs in a pan with a bit of oil for a few minutes to quickly release essential oils before blending. Both methods yield delicious results. Customize herb salt blends to highlight ingredients used frequently in your kitchen. Consider combinations like:
Lemon Rosemary—With freshly grated lemon zest
Garlic Parsley—Plus crushed red pepper flakes
Lavender Thyme—With hints of orange zest
Basil Mint—With toasted pine nuts
Store herb salt blends in airtight containers away from light and moisture. Over time, the salt may absorb moisture from the herbs and clump together. Simply break up any clumps as needed. With proper storage methods, herb-infused salts stay fresh and flavorful for at least a year.
The Power of Preserved Herbs
Experimenting with unique herb vinegars and salts provides an outlet for abundantly harvested garden herbs at their peak. Both vinegars and salts act as flavor preservers, extending the life of fresh herbs for months or even years. Preserved herbs also make wonderfully thoughtful edible gifts. For best quality and safety, always use fresh organic herbs, sterilized equipment, and proper storage when infusing vinegars and salts. With an abundance of nature’s flavors preserved through these simple techniques, there is no shortage of ways to enjoy your lovingly grown herbs all year long.
The Shelf Life of Properly Stored Herbs
# The Shelf Life of Properly Stored Herbs
Properly harvested and stored herbs can retain their flavor and aroma for months or even years. Knowing the approximate shelf life of dried and frozen herbs allows you to use your garden bounty year-round in your cooking.
## How Long Do Dried Herbs Last?
Dried herbs that are stored correctly in airtight containers away from heat, light, and moisture can last for up to 2 years. During this time, they will slowly lose flavor and aroma potency.
Whole dried herbs like oregano, thyme, rosemary, and sage tend to retain their flavor better over time compared to delicate herbs like basil, tarragon, chives, and parsley. After 1 year, dried basil will lose most of its flavor while oregano and rosemary will still taste quite potent.
Here are the approximate shelf lives for properly dried and stored herbs:
– Oregano, thyme, rosemary – 2 years
– Sage, marjoram – 1-2 years
– Lavender, lemon verbena – 1-2 years
– Basil, tarragon, chives – 6 months to 1 year
– Parsley, cilantro, dill – 6 months
If stored properly, most dried herbs will still be usable for seasoning and cooking after their peak flavor time, but may require you use more to impart flavor and aroma.
## Maximizing Shelf Life of Dried Herbs
Follow these tips to help your dried herbs retain the maximum flavor and aroma before their inevitable flavor decline:
– Dry herbs quickly in a warm, dark area soon after harvest.
– Store dried herbs in airtight glass jars kept in a cool, dark cupboard away from heat and light.
– Fill storage jars full to minimize air exposure. Vacuum seal if possible.
– Buy dried herbs in smaller quantities to use within 6 months to 1 year for best flavor.
– Label jars with herb name and year harvested for easy identification.
– Crush or grind dried herbs just before use to release oils and flavor compounds trapped inside.
## How Long Do Frozen Herbs Last?
Compared to drying, freezing is an excellent way to extend the shelf life of fresh herb leaves while retaining color and flavor. Properly frozen herbs can keep for about 6 months before deteriorating in quality.
Here are some guidelines for frozen herb storage times:
– Basil, parsley, cilantro – 3 months
– Chives, tarragon, lemon balm – 4 months
– Sage, rosemary, thyme, oregano – 6 months
Frozen herbs tend to lose flavor faster than dried herbs. But their quality is usually superior when used within 6 months compared to year-old dried herbs.
## Tips for Maximizing Frozen Herb Quality
Follow these best practices when freezing garden herbs to lock in flavor and color for as long as possible:
– Harvest herb leaves in early morning.
– Rinse gently and pat dry with towel.
– Lay single layer of leaves on baking sheet and freeze solid.
– Transfer frozen herbs to ziplock bags, removing air.
– Label with name and date frozen for easy ID.
– Use within 6 months for best quality.
Storing your bountiful garden herbs properly ensures you can savor their flavor in recipes all year long. With the proper harvesting, drying, and freezing techniques, you’ll have quality herbs on hand for home cooking for up to 2 years.
Signs that Stored Herbs Have Gone Bad
Knowing when dried or frozen herbs have gone bad is important for both flavor and food safety. Carefully stored herbs can last a year or more, but there are some clear signs that your preserved garden herbs have deteriorated in quality or become unsafe to use. Being able to identify these signs will ensure you use up your herb harvest while it’s still at peak freshness.
Herbs that show signs of mold should be discarded. This includes dried herbs stored in jars or bags as well as frozen herbs. Any fuzzy growths or spots on leaves are an indication that moisture and air have enabled mold to take hold. Do not attempt to salvage unaffected parts of the herb, as the spores may have spread. When storing herbs for preservation, be sure containers have tight seals and check periodically for condensation or moisture buildup.
Dried herbs that have taken on a dull, faded appearance or changed color have likely aged past their prime. The vibrant greens, browns and grays you saw when the herbs first dried indicate the presence of flavorful oils and compounds. As herbs sit for months, these tend to evaporate or break down. A dull or uniform color, especially brown, usually means the herb will impart less flavor. Smell the herb, and if you detect very little aroma, consider replacing it with a fresh batch.
Herbs that have gotten very dry and brittle have often lost some of their essential oils, or their cell walls may have deteriorated. To test for this, rub a small leaf or section between your fingers – it should release fragrant oils and feel slightly soft or leathery. If the herb crumbles instantly into a gritty powder or dust without releasing aroma, it is past its shelf life. These extremely dry herbs will still add some flavor, but lack the nuance and vibrancy of well-preserved ones.
Frozen herbs that show signs of freezer burn – dry, shriveled brown edges or a grayish cast – are still safe to use but will likely have a muted flavor. Trim off the damaged sections of leaves or seeds. Then crush a small portion and smell it, tasting if necessary. If it has maintained good color and aroma elsewhere, use the unaffected portions right away instead of returning it to the freezer.
Soft or slimy herbs have usually gotten too warm during storage and are at risk for bacterial growth. This applies to both frozen and dried herbs. Discard any herbs that feel moist, limp or mushy instead of dry and crisp. Even if mold is not yet visible, the texture indicates organisms are breaking down cell walls and digesting components of the leaves. Do not taste or smell soft herbs, as consuming spoiled bacteria can cause illness.
If your dried herb contains visible webbing, tiny white dots or small worm-like insects, it has likely been infested by pantry moths or herb weevils. Discard the contaminated herbs immediately, checking any remaining stored herbs closely for signs of insects. As prevention, store herbs in airtight containers and use up opened dried herbs within a year.
Noticing one or more of the above signs means it is time to refresh your preserved herb supply. Compost or discard herbs past their prime to avoid wasting the other ingredients you pair them with. Dried herbs more than a year old can be used for light flavor in long-cooked dishes, but will lack vibrancy. Refer to your logs or labels of harvest and storage dates, using up older herbs first. With careful handling, the herbs gathered from this year’s garden can provide intense herbal flavor for many more recipes when you learn the signs of stale, moldy or low-quality preserved herbs.
Cooking with Last Year’s Dried Herbs
Here is a draft part of the article on “Cooking with Last Year’s Dried Herbs” for your niche culinary site exploring recipes, gardening, and the cultural significance of herbs and spices:


Cooking with Last Year’s Dried Herbs
If stored properly, most dried herbs can retain excellent flavor for 12 months or longer. However, there will come a time when your supply from previous seasons starts to lose its potency. How can you tell if last year’s dried herbs are still good? Here are some tips for evaluating the quality of stored dried herbs and how to use up any that may be past their prime.
Look
Visually inspect the dried herbs. They should retain a good color without excessive fading or darkening. Whole herbs like thyme and rosemary should not appear broken down or powdery. If stored properly in a cool, dark place, the herbs should look similar to when they were originally dried. Any major color changes, visible mold, or strong musty odors indicate the herbs are too old to enjoy.
Smell
A quick sniff test will tell you a lot about your dried herb’s freshness and suitability for cooking. Most dried herbs will lose some of their more subtle aromatic qualities over time but should still smell true to their essence. If the aroma is extremely faded, musty, or dusty, it’s best not to cook with them.
Taste
If your dried herbs pass the sight and smell tests, do a taste test by nibbling a tiny bit. The flavor should taste vibrant and resemble the taste you’d expect from the fresh versions. Stale dried herbs may taste flat, dusty, bitter or have slight off-flavors. Trust your taste buds – if the herb doesn’t taste right, don’t use it in recipes.
Using Old Dried Herbs
If your dried herbs are still decent but lack their original punch, use them up by making herbal vinegars, compound butters, herb-scented oils, or herbal salts. Their fading flavors will still come through. You can also use weaker dried herbs in simmering dishes like soups, stews, beans or grains where they’ll have time to infuse the dish with gentle herbal essence. Avoid relying on lackluster dried herbs for quick cooking or as a main flavoring.

When to Toss Old Herbs
If dried herbs have truly gone downhill, it’s best to compost and replace them. Using faded or funky-tasting dried herbs can ruin the flavors of your carefully prepared recipes. Stick to vibrant, aromatic herbs at their peak to get the most out of your dishes. Plan to grow, buy or dry a fresh batch of herbs each season.
Key Takeaways
– Visually inspect dried herbs for good color and texture
– Sniff herbs and taste a small sample to check potency
– Use weaker herbs in slow-simmered dishes rather than quick cooking
– Toss extremely faded or funky-tasting dried herbs
– Grow and dry fresh herbs every season for best flavor
With proper storage methods, most dried herbs can last 12 months or longer before their flavor and aroma start to deteriorate. By evaluating the look, smell and taste of older herbs, you can decide how to best use up this pantry staple. Though faded herbs won’t be delicious enough for front-and-center flavor, they can quietly bolster soups, stews and more before their time is up. Planning ahead to grow, buy or dry a fresh batch of herbs each season is key for savoring vibrant, aromatic flavors in your home cooking.


No comment yet, add your voice below!